Home automation installer: what to assess before choosing
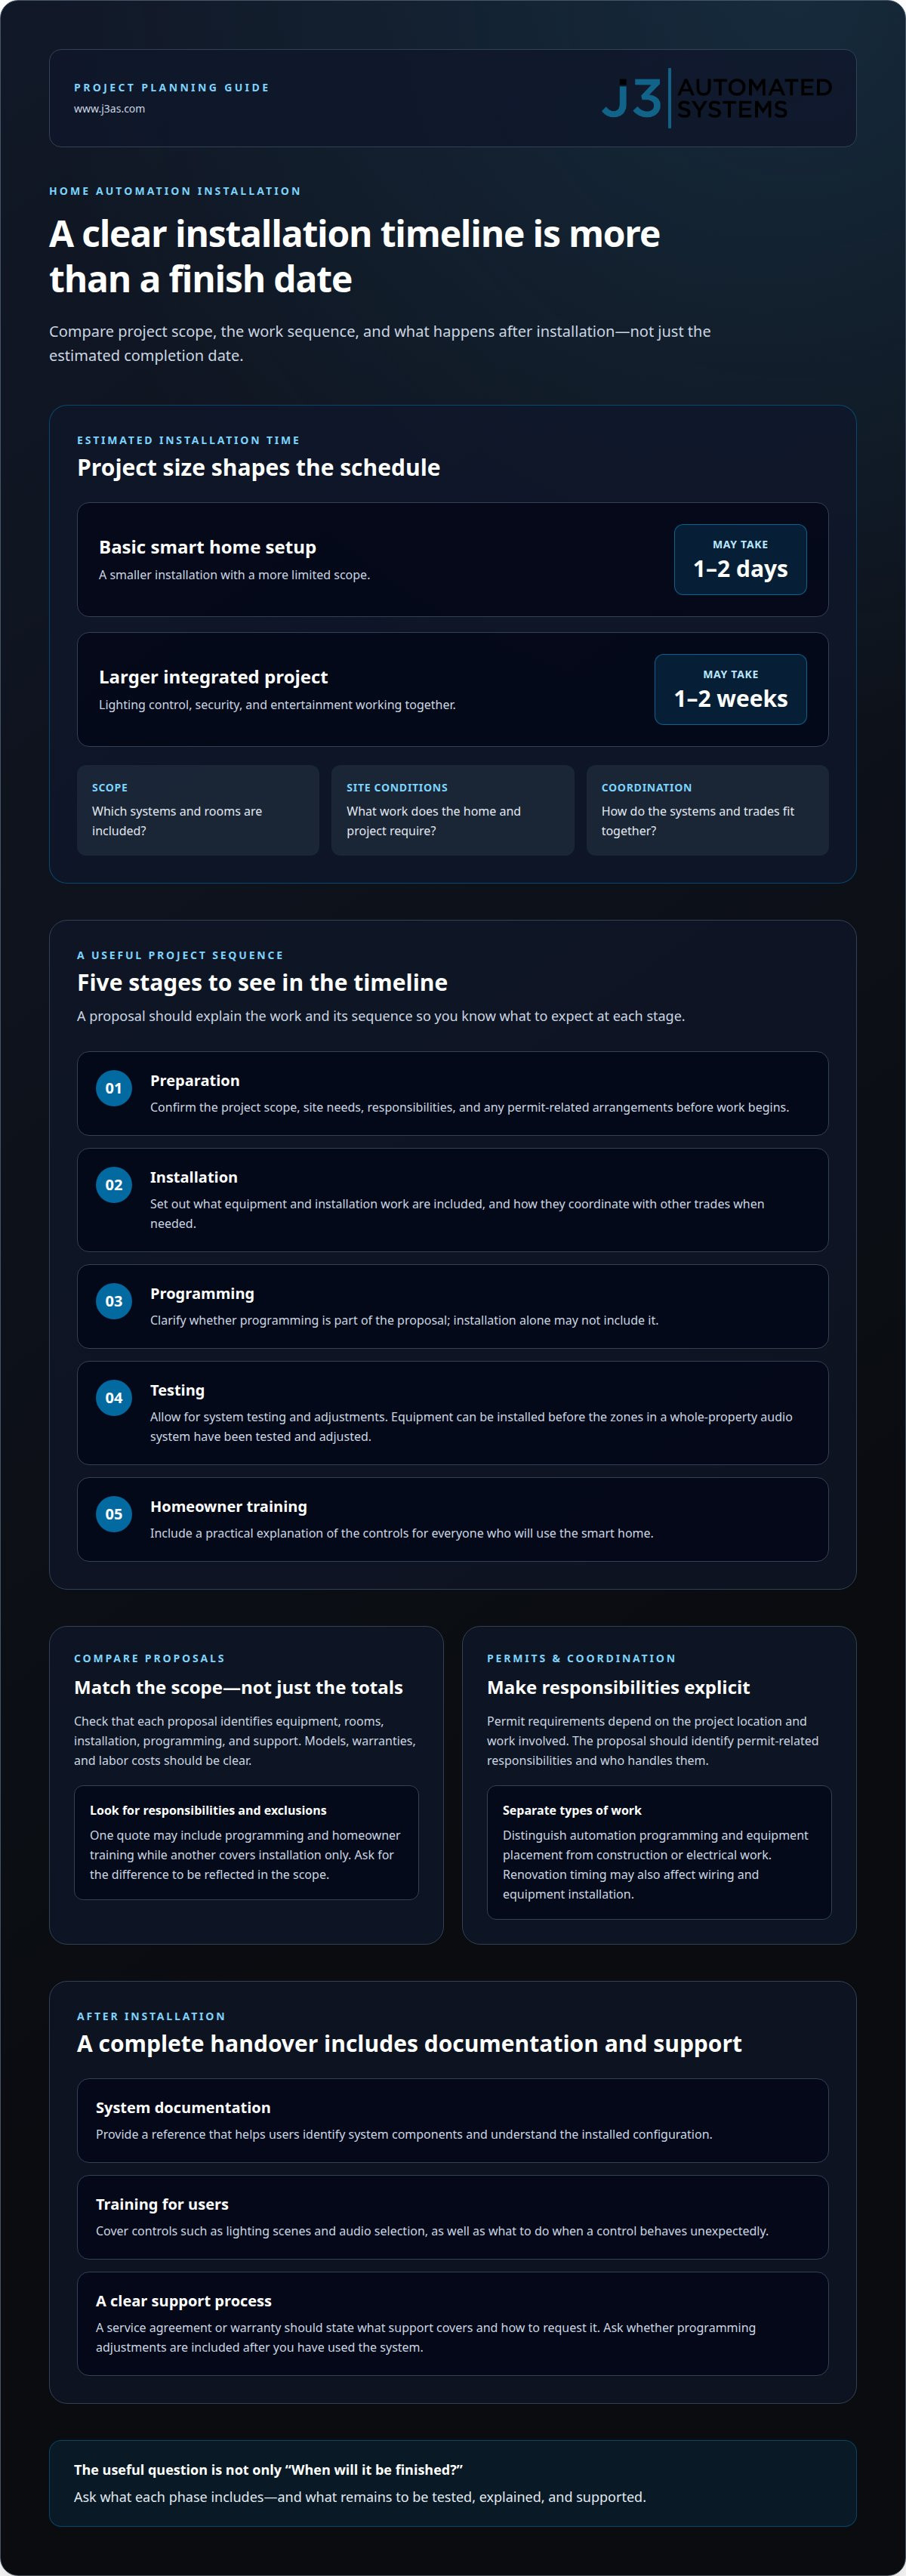
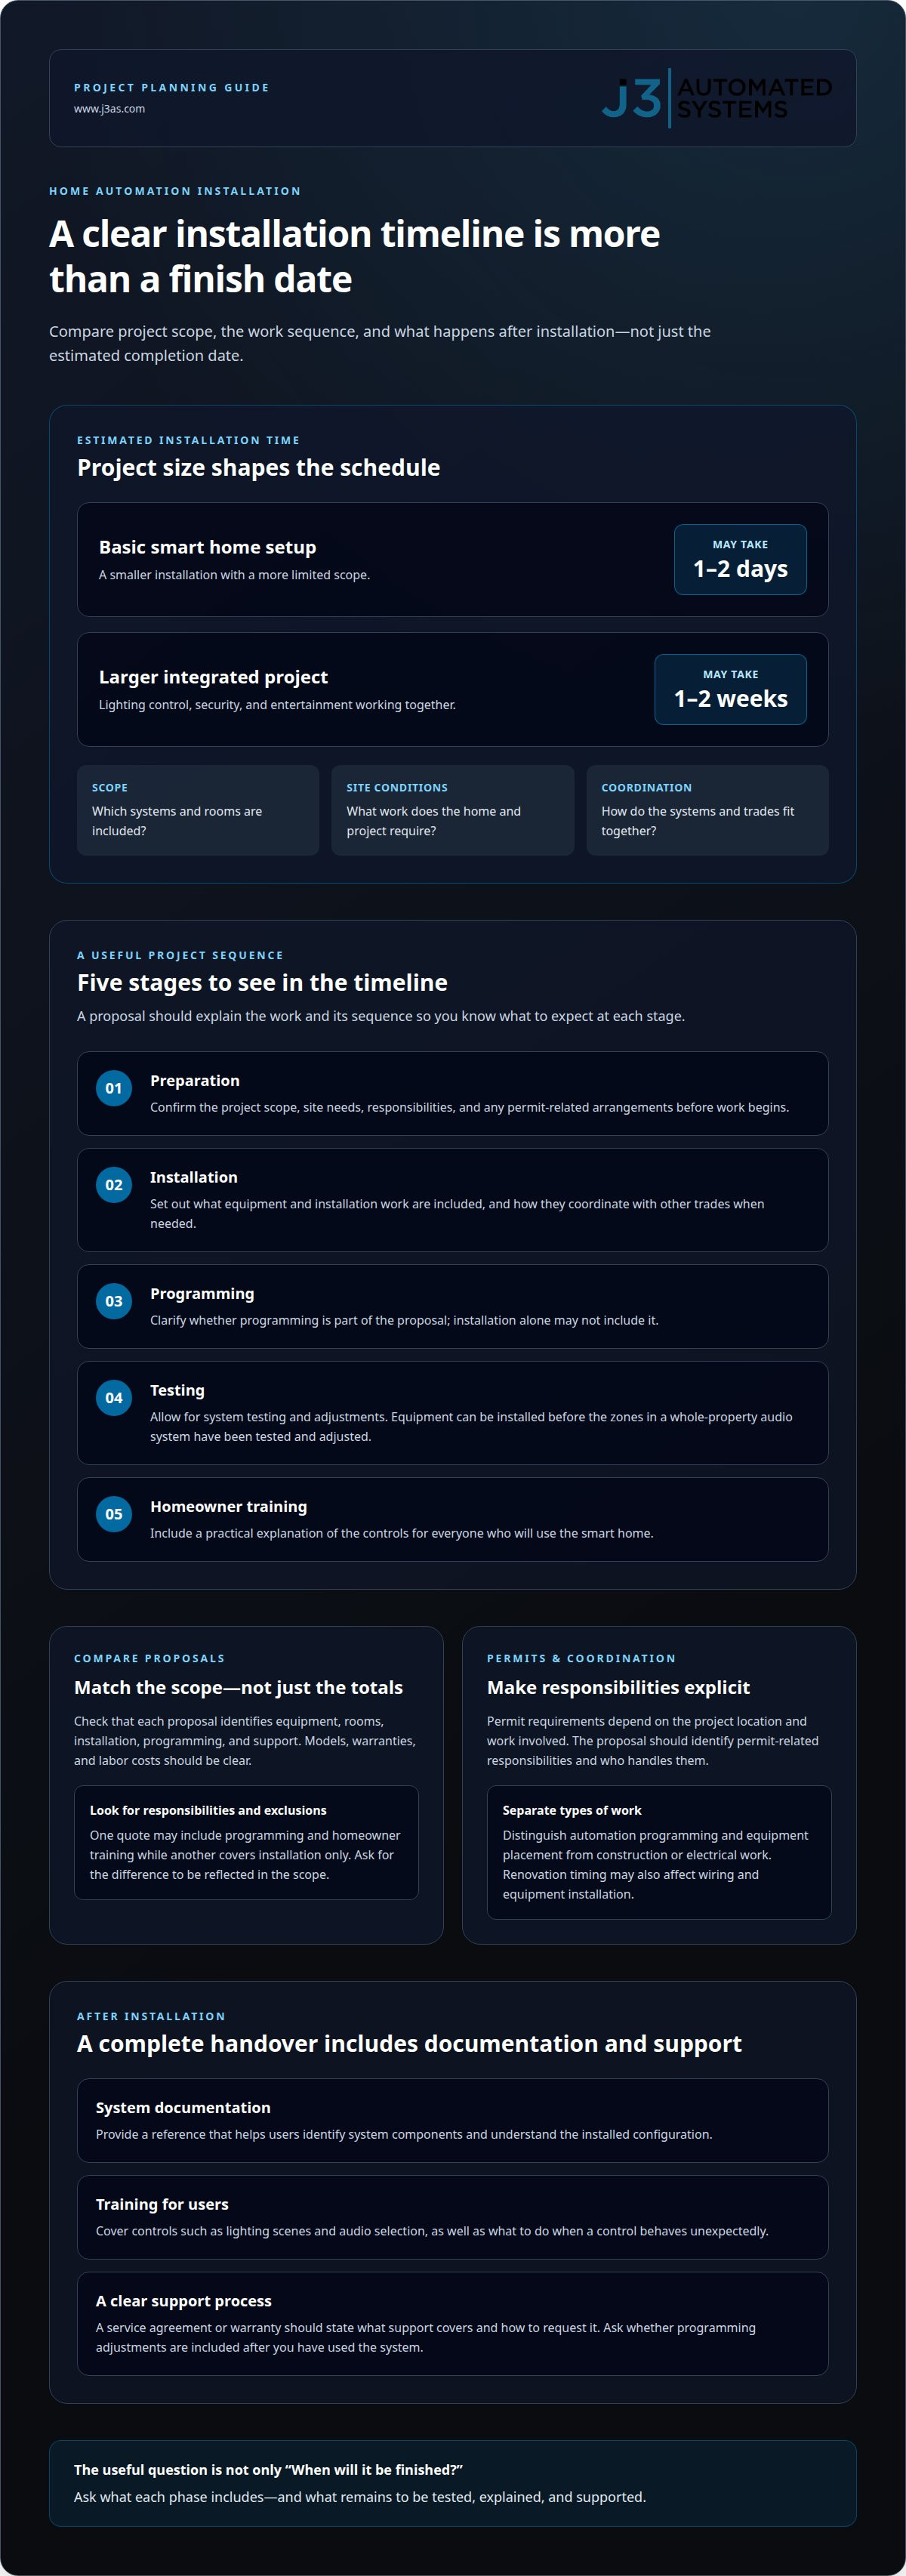
A basic smart home setup may take one to two days to install, while a larger project integrating lighting control, security, and entertainment can take one to two weeks. The schedule depends on the project scope and the work required to connect the systems. Knowing how to choose a home automation installer means looking beyond the estimated finish date.
A clear timeline matters, but so does the foundation behind it. Network capacity, wiring, equipment placement, and programming all affect how reliably a home works after installation. A proposal should explain the work and its sequence, so you know what to expect at each stage.
This guide explains how to assess an installer’s timeline, technical plan, experience, transparency, references, and portfolio. You’ll learn what a thoughtful plan covers, how to recognize clear communication, and why an integrated system depends on more than its devices. The goal is a smoother project and technology that feels natural to use.
Key Takeaways
- Assess the installer’s project plan and scope together so you understand what the timeline includes and how the work will unfold.
- Look for a network and wiring plan that accounts for coverage, connected equipment, and future access to the system.
- Evaluate experience and transparency through clear explanations of responsibilities, project risks, and how decisions or changes are handled.
- Use reviews, references, and project portfolios to understand how an integrator approaches completed work and the homeowner experience.
- For a coordinated entertainment space, consider how cinema-grade home theater can fit into the wider home automation design.
1. Choosing an installer over focusing on a system brand
A familiar brand can be reassuring, but the installer’s design decisions shape how the system works every day. A practical starting point for how to choose a home automation installer is to describe your lifestyle: note which rooms need lighting control, where music should play, and how you want to operate each function. A considered design connects devices around those routines instead of leaving separate controls for every brand. Control4, Crestron, and RTI are examples of platforms used in professionally designed smart homes, but the platform name alone cannot show how well a system fits your home.
In the United States, home automation installation costs depend on the project scope. Equipment, rooms, wiring, programming, and labor all affect the work involved. Platform support also depends on the specific devices and how they need to interact. Share a list of device brands and model numbers with the design team, then describe the functions you want to connect. This makes compatibility and integration part of the design conversation, rather than an assumption based on a logo.
For a new build, involve the technology team before the walls and finishes are complete. Early planning can make prewiring cleaner and more cost-effective than adding infrastructure later. Deciding where lighting keypads, network access points, and audio connections belong helps coordinate wiring routes with room layouts. Plan for future use, too: a family room that may become a media space needs a different infrastructure discussion from a room with no planned technology.
Match system complexity to the design and programming expertise the project needs. A few connected devices require different coordination from a whole-property system combining lighting, audio, climate, and security. As complexity grows, component selection, control logic, and testing become more important. During a demonstration, see whether one action can connect relevant functions, such as dimming lights while starting a listening scene. The example should reflect your routines, not just showcase features.
Documentation and consistent programming support future maintenance. An organized system records equipment locations, wiring labels, and how controls are configured. Clear naming matters: “Living Room” is more useful than “Device 14” when someone needs to adjust a setting. Programming should also behave consistently across rooms, so the same type of control does not produce unrelated results. These details help another technician understand the system and give homeowners a reliable reference when routines change.
A real-environment demonstration can reveal details a brochure cannot, including control flow, response, and how multiple devices connect. The Matter standard, released in October 2022 by the Connectivity Standards Alliance, is one example of an interoperability effort, but a standard does not replace project-specific design. When weighing how to choose a home automation installer, use a demonstration to judge whether the proposed interface feels clear and whether the system’s complexity fits your household. Choose the design that supports your routines, not simply the platform with the most features.
2. How long does a full smart home installation take?
A basic smart home setup may take one to two days to install, while a larger installation involving lighting control, security, and entertainment integration can take one to two weeks. The schedule depends on the scope, site conditions, and coordination between systems. A useful timeline separates preparation, installation, programming, testing, and homeowner training. Equipment installation, for example, may finish before the zones in a whole-property audio system have been tested and adjusted.
Compare quotes by matching their scope, not just their totals. Each proposal should describe equipment, rooms, installation, programming, and support, with models, warranties, and labor costs clearly identified. It should also explain responsibilities and exclusions so you can compare like with like. One quote might include programming and homeowner training, while another covers installation only. Ask for the difference to be reflected in the scope before comparing proposals.
Permit requirements depend on the project location and the work involved. Before work begins, the proposal should identify permit-related responsibilities and explain who handles them. Automation programming and equipment placement are different from construction or electrical work, so the scope should distinguish these tasks clearly. During a renovation, for example, coordination with other trades may affect when wiring or equipment can be installed; homeowners coordinating broader electrical or structural renovations can consult platforms like trade-hive.co.uk to find trusted local tradespeople for site preparation.
Documentation and training are part of a complete handover. The installer should provide system documentation and explain how to use the controls. Training should include everyone who will use the smart home, not only the person coordinating the project. A practical session can cover lighting scenes, audio selection, and what to do when a control behaves unexpectedly. Documentation should help users identify system components and understand the installed configuration.
Support matters after installation, particularly when software updates arrive or components need attention. A clear service agreement or warranty should state what support covers and how to request it. Ask what happens if a room’s controls stop responding months later, and whether programming adjustments are included after you have used the system. Responsive, knowledgeable support can help diagnose problems before they disrupt everyday routines. The proposal should explain the process, not rely on a vague promise of help.
Professional support also means setting expectations about communication during the project. A defined point of contact, progress updates, and a record of decisions help homeowners understand what is complete and what remains. For whole-property audio, the handover should show how to select sources and operate different listening zones. A well-planned whole-property audio system connects those controls with the household’s routines. Confirming the schedule, scope, documentation, training, and support together gives the timeline practical meaning.
3. Network, wiring, and equipment infrastructure
A home automation system relies on the network beneath it. Wireless devices depend on Wi-Fi, so weak coverage can affect control and reliability. A useful network plan identifies access point locations, wired Ethernet connections for critical devices, and areas where interference or dead zones may disrupt service. A room with a television, control hub, and other connected equipment, for example, may benefit from wired connections rather than relying entirely on Wi-Fi.
Network needs vary across a property. Large homes, concrete construction, outdoor spaces, guest areas, and homes with many connected devices all deserve attention in a network assessment. The installer should consider where the signal needs to reach and how device numbers and placement affect network capacity. A strong signal in the main living area doesn’t show whether an outdoor space or upstairs guest room will stay connected.
Good infrastructure planning connects the network plan with wiring routes and equipment layout. The work includes precise wiring, equipment placement, configuration, and programming. For new construction or renovation, involve the technology team while walls and finishes are still being planned. This can make prewiring cleaner and more cost-effective than adding infrastructure later, and gives the team a chance to coordinate cable paths with how each room will be used. Routine electrical inspections and upkeep from certified professionals like ALElectrical also help ensure that the underlying power infrastructure safely supports your home's connected technology.
For new low-voltage cable installations, the project plan should consider the cable types and needs of the system. The project plan should identify which locations need cable and how each run supports the system. Critical devices may use wired Ethernet, while other devices rely on Wi-Fi. This division helps the network design account for the role of each connection instead of treating every device as interchangeable.
When Wi-Fi performance is inconsistent, start troubleshooting with device location and coverage. An installer can assess access point placement, signal reach, interference, and network capacity in the areas where devices operate. If controls work indoors but fail on a patio, for example, the outdoor coverage plan needs attention. If a connected device struggles in a concrete-built room, the assessment should account for the construction and available connection options.
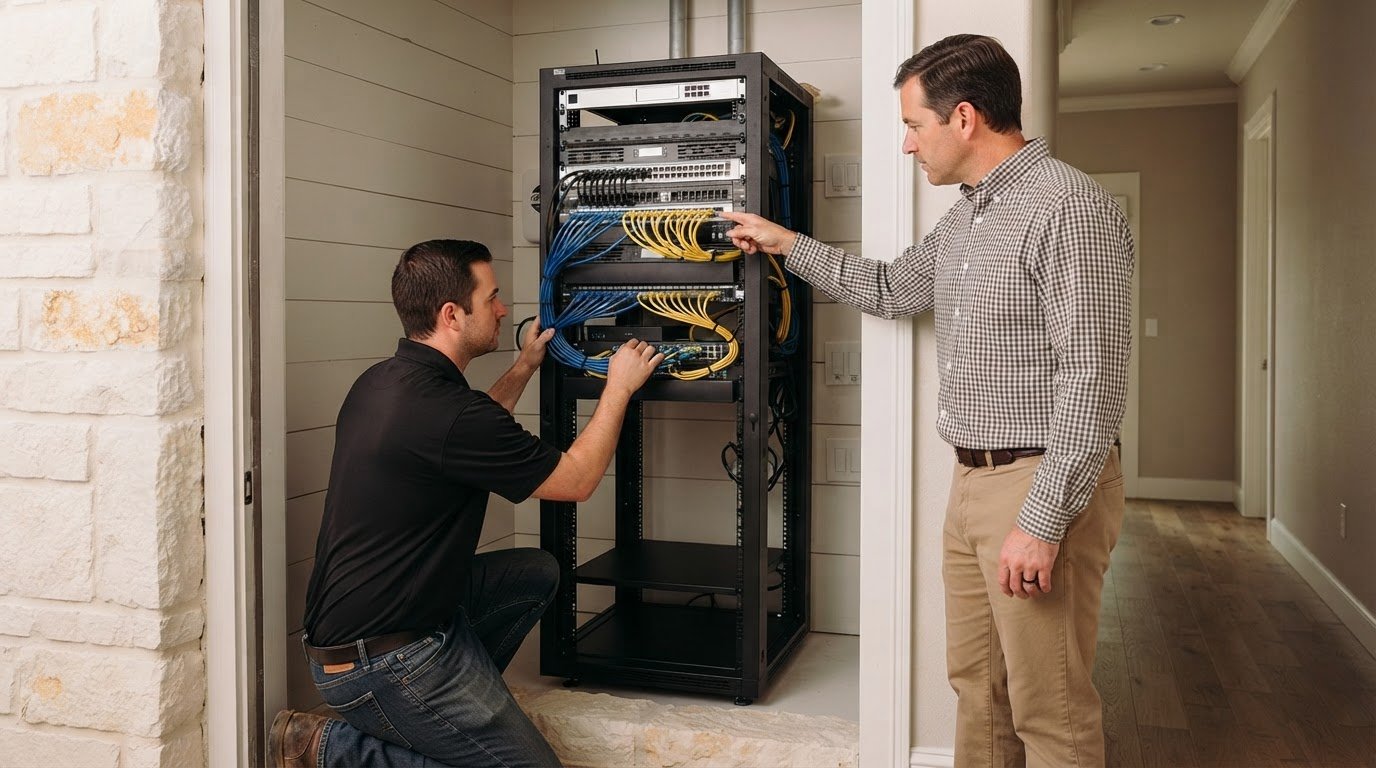
Equipment organization also affects how easily a system can be serviced. A considered layout gives components and wiring clear locations, while labeled connections show what serves each room or function. The design should document how network equipment connects with automation components. Remote access also deserves a clear explanation: homeowners should understand how to reach the system while traveling and which network connections support that access.
Ask for an infrastructure plan showing access point placement, wired connections, cable types, equipment locations, and coverage gaps. It should explain how each decision supports the intended use of the property. The plan also provides a practical basis for resolving Wi-Fi issues later, because the network design and connected equipment are mapped rather than treated as separate pieces.
4. Evaluating an integrator’s experience and transparency
Residential automation experience matters because a home’s rooms, routines, and controls need to work as a coordinated whole. Ask how the integrator approaches projects that combine lighting, climate, audio, and security. A strong explanation connects technical decisions to daily use, such as how a lighting scene behaves when someone starts a movie. Examples from comparable residential projects can show whether the team understands that coordination.
Credentials can provide useful context. CEDIA sets training and ethics standards for the home technology integration industry. Ask what relevant training or manufacturer credentials the people designing and installing your system hold, and who will do the work. The installer should explain whether trained in-house technicians, subcontractors, or both will be involved. Clear responsibility matters: know who handles design, programming, installation, and later service.
A local smart home company or a national installer may be a good fit. Compare how each handles your project’s design, communication, installation, and ongoing support. Consider the home’s complexity and whether the proposed team can explain its approach across all planned systems. A company’s location alone doesn’t tell you who will be responsible or how the work will be coordinated.
Before hiring, ask who leads the project, how changes are documented, and how potential risks are raised. Ask for an example of a design decision that could affect integration, such as coordinating climate controls with lighting scenes. The installer should explain the options and their implications before a change becomes disruptive or expensive. Look for specific answers that clarify trade-offs, not vague assurances.
Transparency should also appear in the written proposal. It should define the scope, identify responsibilities, and explain how changes are handled. Check that the planned systems and their controls are described in language you can follow. If “integrated climate control” appears without specifying the rooms or functions it covers, ask for a clearer description in the project documents. The goal is a shared understanding before installation begins.
An unqualified or poorly matched installer can leave homeowners with unreliable performance and confusing controls. In a home combining lighting and climate automation, inconsistent programming may make everyday tasks harder instead of simpler. More advanced systems also require greater design, programming, and maintenance expertise. The risk is more than a disappointing interface: unclear system logic can complicate future troubleshooting and changes.
Use the first conversation to assess the quality of the explanation. A capable integrator can describe how design choices support your routines, where project risks may arise, and how responsibilities are assigned. Ask directly who will do the work and how decisions are made. Clear, specific communication is something you can assess before the system is installed.
5. Reviews, references, and project portfolios
Reviews can reveal how an integrator communicates after installation, not just how the system looks on completion day. Look for specific accounts of project coordination, user training, and support when a component needs attention. A review describing help after software updates offers a different signal from a brief rating without context. Look for recurring themes, while remembering that each customer’s project is an individual experience.
References add context that a portfolio cannot provide. A completed home may look polished, but its owner can explain whether the controls remained intuitive in everyday use. Focus on examples relevant to your project, such as lighting scenes, audio zones, or a renovation designed around existing finishes. Feedback is most useful when the reference project’s needs are similar to yours.
Use a consistent set of questions when assessing customer feedback: Was the project scope explained clearly? Were changes communicated? How did the handover work? Ask a reference whether household members understood the controls after training and how the installer handled a later adjustment. These details help distinguish a finished installation from a system that remains usable as routines change.
A portfolio is most useful when it shows the thinking behind the finished rooms. Look for examples that explain the homeowner’s goals, the systems brought together, and how the controls support those goals. A photo of a keypad or equipment rack alone cannot show how scenes work across a home. Project descriptions connecting design choices to everyday use provide more meaningful evidence.
Manufacturer credentials and industry credentials are different from customer reviews. CEDIA sets training and ethics standards for the home technology integration industry, while manufacturer credentials may relate to particular platforms. Consider each alongside relevant residential examples and owner feedback. A credential alone doesn’t show how clearly an integrator communicates or documents a specific project.
For licensing, identify the requirement that applies to the work and location, then verify the installer’s status with the relevant licensing authority. Separately, request proof of liability and professional indemnity insurance. References can help you understand how the installer works in practice. Licensing and insurance documents address different concerns, while customer accounts describe the project experience.
Give reviews, references, and portfolio examples different roles in your assessment. Reviews indicate recurring communication themes; references add firsthand detail; portfolios show design and execution. Consider how each source supports your priorities, such as easy-to-use scenes or coordinated lighting and audio. If those elements are central to your plans, discuss your home automation project with J3 Automated Systems.
J3 Automated Systems: Cinema-grade home theater
J3 Automated Systems designs and builds cinema-grade home theater for homeowners seeking a considered, integrated entertainment space. It can also bring whole-property audio and automated lighting and shades into the broader home experience, so the room’s controls and connected systems support how you use the space.
Consider this next step when your project calls for more than selecting equipment, particularly when you want home theater to sit within a coordinated automation design. For commercial properties, J3 Automated Systems also provides building automation for HVAC and BMS.
To discuss your project and the systems you want to bring together, contact J3 Automated Systems.
Shape a system around the home you want to live in
Start by turning your priorities into a clear picture of daily life at home. Consider the moments technology should support, from settling in for a film to moving between rooms with coordinated music and lighting. That vision gives the design conversation a purpose beyond choosing devices and helps align the system with how the home is used.
When deciding how to choose a home automation installer, look for a partner whose work connects the experience you want with thoughtful system design. J3 Automated Systems offers cinema-grade home theater, whole-property audio, and automated lighting and shades, bringing distinct elements together as part of a considered residential project.
Bring your plans and priorities into a conversation about what the home could become. Start a conversation with J3 Automated Systems and take the next step toward a home that feels more intuitive to live in.
Frequently Asked Questions
How long does a full smart home installation take?
A basic smart home setup may take one to two days, while a larger installation involving lighting control, security, and entertainment integration can take one to two weeks. The schedule depends on the project scope and the work needed to install, configure, and test the systems. For a home in San Antonio or Austin, ask the proposal to clarify which project stages the timeline covers and how completion will be assessed.
What certifications should a home automation installer have?
Relevant credentials may include CEDIA training and manufacturer certifications related to the platforms in the project. CEDIA sets training and ethics standards for the home technology integration industry, so its credentials can provide useful context. Certifications are one part of an assessment, not a substitute for clear project planning. Consider whether the installer can explain how their experience applies to your home’s systems and integration goals.
What should I expect after the installation is complete?
Expect a handover that helps you operate and understand the installed system. It can include system documentation, training for the people who use the home, and an explanation of available support. Training might cover changing a lighting scene or selecting an audio source. Ask how to request a programming adjustment once your household has used the system and identified a routine it wants to refine.
What qualifications and certifications should a home automation installer have?
Look for relevant experience with residential systems and ask who will design, program, and install the project. CEDIA’s Integrated Systems Technician credential is one industry qualification; manufacturer certifications may also relate to the equipment or platform being used. Ask how the team’s qualifications match your project. A system combining lighting, audio, and climate control calls for experience coordinating those elements, not just installing individual devices.
What warranties, service plans, and ongoing support should a home automation installer provide?
Review the written service agreement or warranty to understand what it covers, how support requests are handled, and whether programming adjustments are included. Software updates and occasional component failures can mean a system needs attention after handover. Clarify the process for getting help if a control stops responding months later. The proposal should distinguish installation coverage from ongoing service, so you understand the support arrangement.